
Chromaline 10-Step Exposure Guide | Exposure Step Test – Troubleshoot & Perfect Your Emulsion Exposure
Chromaline
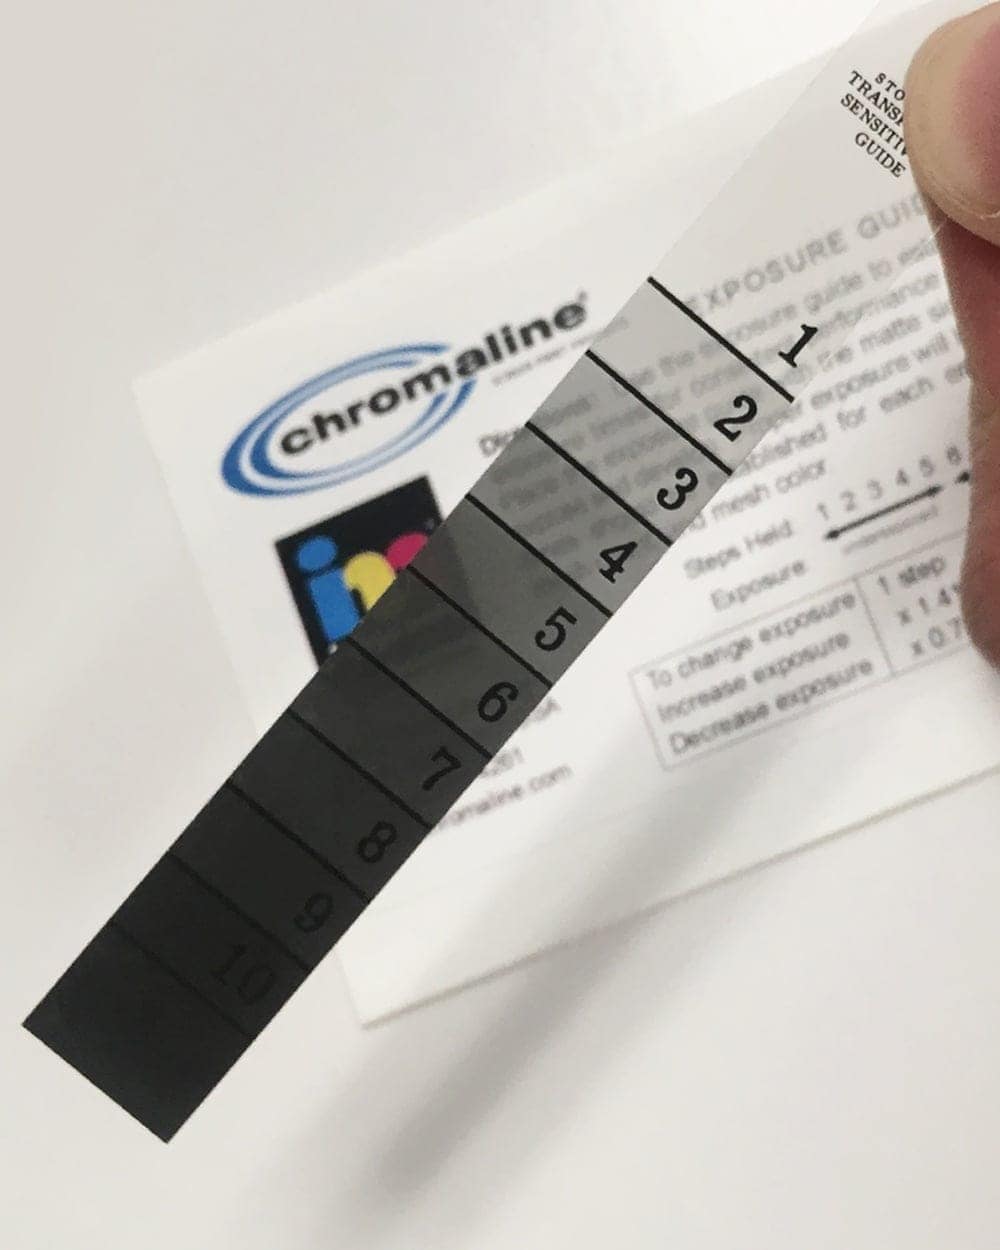
The Chromaline 10-Step Exposure Guide is a compact density step wedge that dials in the exact exposure time for any emulsion — and takes the guesswork out of burning screens. Over 90% of stencil failures come down to incorrect exposure, and this tool finds your correct time in a single screen instead of a stack of wasted test screens. At just 0.5″ x 3.5″ it delivers the same accuracy as a 21-step guide with easier-to-read solid line divisions. Works with any emulsion and any light source.
Dial in any emulsion, any light source
Ends under- and over-exposure
Compact, easy-to-read solid divisions
Catch a fading bulb or new batch
Stop burning test after test
A few dollars vs. wasted screens
$14.95
Description
Chromaline 10-Step Exposure Guide — Stop Guessing at Exposure
Exposure time is the single biggest cause of stencil failure — and the one most shops guess at. This little density step wedge ends the guessing. Tape it to your exposure glass, burn one screen, and read exactly where your emulsion holds and where it fails. In one exposure you’ll know your correct time, and you’ll catch process drift before it costs you a run.
Why This Tool
Diagnose Exposure Issues
Find the ideal exposure time for any screen-printing emulsion — no more trial-and-error test screens.
Prevent Stencil Failures
Eliminate underexposure and overexposure, the two most common (and costly) problems in the darkroom.
21-Step Accuracy, Compact
At 0.5″ x 3.5″ it gives the same precise density readings as a 21-step guide, with solid divisions that are easier to read.
Spot Process Changes
If your step results suddenly shift, something changed — a fading bulb, a new emulsion batch, a thicker coat. You’ll know immediately.
Works With Any Emulsion
Diazo, dual-cure, or pure photopolymer — and any exposure unit. One tool covers your whole emulsion lineup.
Saves Time & Money
Reduce wasted screens and failed prints by getting exposure right the first time, every time.
Why You Need To Dial In Exposure
There is no universal exposure time. Your light source, emulsion, coating thickness, mesh count, and stencil thickness all change how long a screen needs — so the only way to know yours is to measure it. Get it wrong in either direction and it costs you:
Underexposure
Emulsion that never fully hardens washes out in the shadows, breaks down on press mid-run, leaves scummy residue in the mesh, and won’t hold up to long jobs or aggressive inks.
Overexposure
Too much light closes up fine detail and halftones, so thin lines and dots won’t wash out — and the over-hardened stencil fights you when it’s time to reclaim.
One Screen vs. Ten
Instead of burning a stack of test screens at different times, the step guide shows a full range of exposures in a single screen — read the steps and you have your answer.
Consistency Over Time
Bulbs age, emulsion batches change, humidity shifts. Checking the guide periodically catches that drift before it turns into a rack of ruined screens.
What You Get & What You Need
Watch It In Action
How To Use It
1. Attach to the Glass
Tape the 10-Step Guide directly to the glass of your exposure unit, in an area that gets full light during exposure.
2. Expose As Normal
Coat, dry, and expose a screen at your standard settings, then develop (wash out) the stencil exactly as you always do.
3. Read the 10 Steps
After washout, find the step where the emulsion still holds firm but the next step starts to wash out — that transition is your reference point.
4. Adjust
Too many steps washed out? You’re underexposed — increase time. Too few washed out? You’re overexposed — decrease time. Then re-test.
5. Monitor
Once dialed in, check the guide periodically. A sudden shift in the steps means something in your process changed — fix it before you ruin screens.
Round out your darkroom
Pair the guide with emulsion, an exposure unit, and the exposure calculator for repeatable, reliable stencils.
Not sure how to read your results?
Send us a photo of your washed-out step guide and we’ll help you dial in — message us on Tidio or call.
Technical Specifications
Chromaline 10-Step Exposure Guide — Technical Specifications
| Specification | Detail |
|---|---|
| Product Name | Chromaline 10-Step Exposure Guide |
| Manufacturer | Chromaline |
| Type | Density step wedge / exposure guide (density filter) |
| Size | 0.5″ x 3.5″ |
| Steps | 10 solid-division steps — same density accuracy as a 21-step guide, easier to read |
| Compatibility | Any emulsion (diazo, dual-cure, photopolymer) and any light source |
| Primary Use | Diagnose and dial in exposure time; monitor for process consistency |
| Reusable | Yes |
| Best Paired With | Chromaline Exposure Calculator, screen emulsions, exposure units |
| Availability | In stock — free in-store pickup; ships nationwide |
| SKU | CH 10-Step Exposure Guide |
Related & Resources
Technical Sheets / Safety Data Sheets / Documents
FREQUENTLY ASKED QUESTIONS
Chromaline 10-Step Exposure Guide — Frequently Asked Questions
Dialing in your darkroom?
Send us a photo of your step-guide results and we’ll help you read them — or work through the troubleshooting guide. Message us on Tidio, email, or call.
Reviews
Only logged in customers who have purchased this product may leave a review.
You May Also Like
Related products
-

Ergo-Force Squeegee Handle – Ergonomic Screen Printing Handle for Comfort & Precision
Price range: $12.00 through $36.00 -
RhinoBond RBT 300 – Cyanoacrylate Glue For Screen Making
$39.99 -
Blue Blockout Pen – Pinhole & Touch-Up Pen for Water-Based Screen Printing
$14.99 -
Empty Quart Clear Mixing Containers with Snap on Lid
$4.99

Reviews